Services for the professional assembly of furniture are now available to everyone. However, many men want to do everything on their own, and not so much out of savings as out of interest. Detailed instructions on how to assemble a cabinet will be very useful in such a situation.
Furniture Features
Before proceeding with the assembly, you need to find out the features of the cabinet to work with. By type of construction, the cabinet can be:
- All-assembled. It can be put anywhere. It has walls, a bottom, a back wall and a cover,
- Built in. It is placed in a niche. It may not have walls, cover or floor. Their role is played by the walls of the room,
- Partially embedded. It may not have a couple of details, but not all. For example, a cabinet in the entire wall, in which the floor and ceiling of the room play the role of the bottom and the cover.
According to the type of door, there are:
- traditional swing cabinets
- wardrobes,
- models with lifting doors,
- models with accordion doors,
- cabinets without doors.
The shape distinguishes:
Your future cabinet can be standard, custom-made or prefabricated from different modules. It can have glass inserts, mirrors or decorative panels. Each of these models will have its own assembly features, which must be taken into account.
Necessary tools and accessories
To assemble the wardrobe, you will need to prepare the following tool:
- Screwdriver
- hammer,
- Allen key
- roulette,
- crosshead screwdriver,
- angle ruler.
You will also need to purchase a set of furniture fittings and accessories for the cabinet. This list includes:
- Small nails for fiberboard - about
- confirmations -
- plugs in the color of the chipboard -
- profile for fiberboard - 1 pc.,
- boom holders,
- barbell
- drawer guides,
- legs - optional.
Assembly instructions for the sliding wardrobe are always included with the purchased piece of furniture. They rarely differ in detailed descriptions, are more likely to be calculated for professionals. Let's talk about how to assemble a wardrobe yourself.
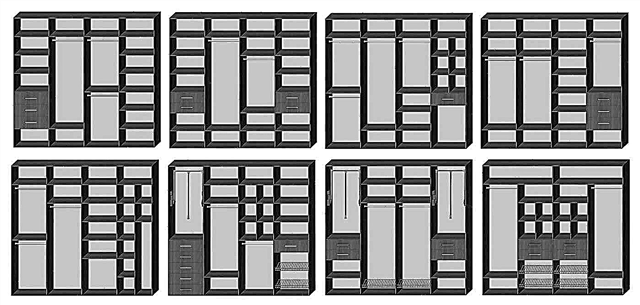
Cabinets and filling diagrams
Today you can find a variety of designs of wardrobes:
- With two, three, four or more sections,
- with drawers and lower shelves for storing shoes,
- two-door, three-door and so on.
Before proceeding with the installation, we suggest that you familiarize yourself with the schemes.

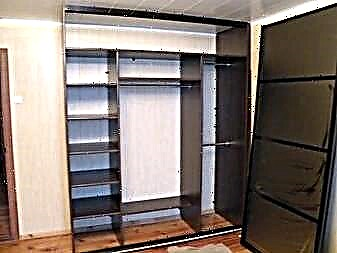
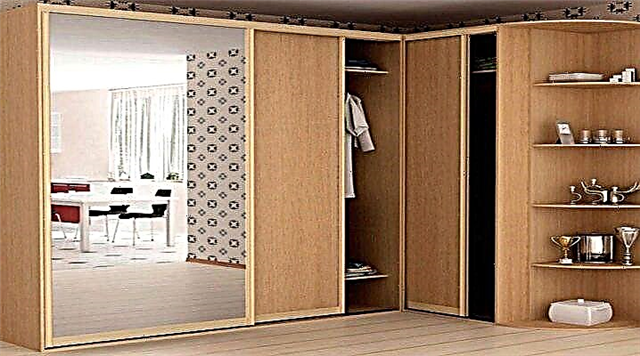
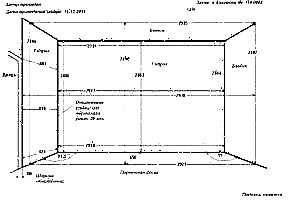
An example of how to assemble a wardrobe with your own hands will be shown in the second option. The diagram shows a cabinet with three sections 2400 millimeters wide and 2600 millimeters high. It has two doors and a corner exterior panel with rounded shelves.

Filling the cabinet is shelves, drawers, clothes rods. It is these features that most often prevent a person from making a choice. Among the variety of furniture designs, it is sometimes difficult to choose what suits you.
When choosing a wardrobe, consider the following details:
- The room where it will be installed
- own requirements for the capacity of the structure,
- features of storage items (linen, clothes, shoes and so on),
- budget.
The place inside it should be used rationally. You can store the trousers separately on the lower section, and for shirts, select a separate bar.
Modern filling is the key to assembling a practical cabinet. Behind the sliding doors today are baskets for storing trifles, hangers for ties, trousers, belts, pull-out shelves and bars, wardrobe elevators.
Having decided on the filling and design, you can proceed to the assembly.
Installation process and features
The installation of the wardrobe includes several standard steps:
- cabinet body assembly
- installation of guides, installation of the back wall,
- door installation.
Let's talk about how to correctly complete all stages of work in the presence of the materials listed above.
Assemble the cabinet on the floor. This is best done in such a position that lifting a heavy hull after assembly requires a minimum of effort and energy. Since the cabinet is equipped with three drawers, the guides should be marked and fixed. They are of two types:
The wizard is required to accurately calculate their location. The difference is that the telescopic models are located strictly in the middle of each drawer, and the roller ones hold the bottom of each, that is, they must correspond to the level of the bottom line of each drawer. We draw attention to the fact that the guiding systems of some companies suggest the indentation of the front part of the box from the edge of the section. It is important to outline the position of the elements, fix them on the side wall and on the inner partition.
It is important to know that a number of cabinet filling elements will also require preliminary marking and installation of fasteners, since then this work will be complicated.
The next stage: the installation of supports (legs), which will prevent contact of moisture with the chipboard during operation. Now the side stack is connected to the bottom of the cabinet using a screwdriver and confirmations. The next part to join is the inner wall. In order for it to obtain optimal stiffness, it is required to connect both walls using a tie shelf.
Assembling a sliding wardrobe with your own hands requires the master to clearly understand the functions of all parts of the structure, accessories. Part of the shelves can be put in place only after the furniture is installed in an upright position.
We assemble the structure further, gradually expanding it. Connecting shelves and one more internal wall will be added. Before you install the side outer wall, we advise you to pre-fix the corner shelves, which will be outside. Once the structure is assembled, you can fix the final element - the top cover.
An approximate assembly diagram of the wardrobe is shown in the photo below. All parts must be chamfered, and all addition work must be carried out. In order for the cabinet, assembled and installed by yourself, to be of high quality, it is better to perform these works on specialized machines.

Screwing in the confirmations is carried out at low revolutions of the screwdriver with confident holding of parts strictly at an angle of 90 °.
We proceed to the next stage: we nail the back wall of the fiberboard. This is done by nailing it with nails to the structure. If the width of the sheet does not allow to close the section, use the connecting profile of the corresponding color. You need to nail the wall from top to bottom.
Now the assembly of the wardrobe is almost completed, it remains to install it in place, collect the drawers, equipping them with guides, and hang the doors.
Built-in cabinet assembly
Installation of the built-in wardrobe closet repeats the assembly steps of the usual in almost everything. It can also have side walls made of chipboard, or it can be assembled in an upright position using metal guides.
There are many ways to make the internal contents of a built-in wardrobe.

Since part of the structure is attached directly to the wall, the installation of a sliding wardrobe of this type can be carried out vertically. Professionals furniture makers know that making a cabinet in a finished niche in place is a complicated and time-consuming job. When ordering, they try to make a cabinet from the chipboard in the workshop according to the size of the room and assemble it in place.
A person who decides to do such work independently in his house has the time and can assemble a reliable, inexpensive and roomy design.
If the perimeter of the built-in structure is walls, floor and ceiling, it is important that they are as even as possible. Useful is the level by which the angle of inclination is measured and the surfaces are leveled before installing shelves, walls and doors. Niche preparation is a serious matter. To do this, the surface of the walls is cleaned, primed and covered with acrylic enamel.
When installing additional lighting inside any design, we recommend using low-power halogen lamps to comply with fire regulations.

Installation of cabinet doors
Installing the doors of a conventional and built-in wardrobe is a crucial moment. A heavy construction will require the help of an assistant, it will be hard to do it yourself.
There are three options for securing doors:
- monorail,
- two rails with upper support,
- two rails with a lower support.
The most common system is based on the lower rail. Reliance on the upper distribution is not received, but is used more often for built-in cabinets, where the guide rail is attached to the concrete ceiling. The assembly of the doors of the wardrobe is divided into several stages:
- cutting profiles
- drilling holes
- installation of horizontal and vertical profiles,
- installation of the finished roller construction.
The profile for doors after cutting and drilling must be sanded with sandpaper. If a mirror is glued to the door leaf, which is very common in structures of this type, you should prepare it in advance by sticking a self-adhesive film on the back side. This is a safety rule.
On mirror and glass doors an additional seal is put on. Now you need to study the door installation guide.
The assembly is assembled on the floor. The first step is to install horizontal profiles. If it’s hard to do it manually, use a mallet. Vertical handle profiles are installed in the same way. They are pre-drilled so that the upper and lower self-tapping screws fall into the grooves of the horizontal profiles.
The process of screwing in the screws is special: first the screw is screwed into a small length, then the roller is inserted, and then it will be possible to fix it, screwing it to the limit. Additionally, vertical and horizontal profiles are pulled together with self-tapping screws.
The next step is to install the upper and lower rails. Not everyone knows how to do this job right. The upper ones are installed first, the outer edge should coincide with the edge of the cabinet cover. The lower rail is installed on the lower edge, but not fixed. So, it is possible to check the angle of the door by setting one of them and checking the operation of the mechanism. In some cases, the lower rail slides inward by 2 centimeters.

Assembling furniture is a rather complicated process, but everyone can do the work himself. Sliding wardrobe - a modern, roomy design, which many dream of. If desired, in each apartment you can assemble such a cabinet.
Sequencing

Making a sliding door cabinet is a step-by-step process.
When making a cabinet with your own hands, the sequence of actions is as follows:
- Room measurements are being taken,
- A furniture project is being developed indicating the dimensions of the structure and an estimate is drawn up for the number of materials and accessories,
- Materials are bought and cut, accessories are procured,
- The mounting base is being prepared,
- Furniture assembly is in progress.
Where to start assembling the wardrobe
Before proceeding with the assembly, you need to decide which furniture to assemble. Conventionally, all sliding wardrobes can be divided into two types:
- Cabinet. In such furniture, in addition to the front part, there are sidewalls, upper and lower parts and the back wall,
- Recessed. This type of furniture is assembled in a niche or along one of the walls in the gap between the two side walls.
| Artwork | Initial work and their description |
 | Measure the wall. If the corners and the adjacency of the ceilings are made at right angles, we measure the height and width of the wall. We measure the wall in width at the top and at the bottom. All measurements are accurate to 5 mm.
|
 | Drawing development. Suppose we want the assembled cabinet to be three-door and have 3 internal sections and a number of open shelves on one side. We leave one compartment under long clothes on hangers. The second compartment in the center will be for shelves and drawers. The third compartment will be designed for small shelves and space for an ironing board. |
 | Estimation and procurement of materials. We calculate the number of materials with exact dimensions and order the necessary number of parts in specialized organizations. We calculate the number of necessary fittings and immediately purchase it.
TrainingBefore assembly, carefully inspect the installation location of the cabinet. Using the building level, evaluate whether the floor and walls are even in this place. As far as possible, eliminate the disadvantages: the smoother the surfaces, the more reliably the cabinet will fall into place.
Prepare the necessary tools for assembly:
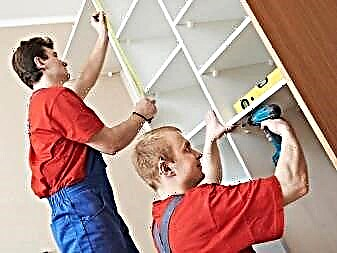
General sequence of workTo assemble the cabinet correctly, it is best to get down to business with an assistant. An ordinary cabinet can be assembled immediately against the wall, or you can assemble a box on the floor. Experts recommend the second option, because it turns out more evenly. True, not every room is enough for this place. First, the bottom, side walls, cover are interconnected. Then the back wall is attached (usually it is made of a thin sheet of fiberboard).
Next, the shelves are going. Usually they are mounted on special corners and collected from the bottom up. If the shelves are complex (for example, with partitions), it is better to assemble them on the floor, and then assemble them ready-made in a cabinet. In a wardrobe, kitchen or wardrobe often there are exit shelves that are rolled forward for ease of use. For them there is a special fittings. These are usually guides with small rollers. A guide is attached to the side walls of the cabinet, and a part with a roller is attached to the shelf.
Metal baskets (for linen, accessories or shoes) are attached in a similar pattern if they are pulled out. If the baskets are stationary, a metal holder is installed for them, and then they are hung with hooks. Drawers are a separate issue. The drawer frame is assembled outside. To do this, the side and rear walls are fastened together. Then the bottom is attached. After that, a handle is attached to the facade of the future box, and then everything is connected together with the box.
A metal rail is installed on the side walls of the cabinet to which the box will be attached. The second part of the guide with a small wheel is attached to the side walls of the box at the right height. A box with a hinged lid is made using the facade and gas lift. First, a handle is attached to the facade, then fittings are installed.Most often, a round part with a sleeve is attached to the sides of the future box, and hook-shaped fasteners are attached to the facade.
The skill of installing drawers and folding drawers will help you make a cabinet with a bedside table. The built-in cabinet below is usually made up of large-width shelves that are closed by swing or folding doors. After shelves and drawers can be installed in the cabinet rods, if they are provided by the scheme. If you are assembling a built-in wardrobe, most mounts will mount directly to the wall. You can make it without a back wall - then you just need to attach the sidewalls (if you do not have a niche) and shelves to the walls. If you want the built-in cabinet to look more solid, make the back wall of the fiberboard sheet.
Tricks from the mastersIt is impossible to list all the nuances of a cabinet assembly in one article. A lot depends on the design of the product. However, there are a number of life hacks that furniture collectors often use to cope with the task quickly and accurately. If the cabinet has a large back wall made of fiberboard, it will have to be attached not only to the lid, bottom and walls, but also to some shelves. Since nails have to be driven in from the back, they often "go" to the side. Masters advise, before attaching the fiberboard sheet to the back of the cabinet, mark the sides of the walls and shelves. And then, having applied the fiberboard, transfer the mark to it. You can safely drive in a nail according to the mark, not being afraid that he will “move out”.
When assembling furniture, you often have to work with confirmations, which are twisted with a hex key. This device is very small, and holding it in your hands is inconvenient. So that the fingers do not get tired, the masters advise cutting off a piece of the tube from the felt-tip pen and putting it on one of the ends of the key. Aluminum profiles are usually sold in plastic wrap. Furniture assemblers recommend removing it only when the profile is finally mounted in a cabinet. Drilling and sawing parts is best straight through the film - so there is less chance of scratching the metal surface. As a result, aluminum inserts will be not only the basis for sliding doors, but also a shiny metal finish on the cabinet. On how to assemble a wardrobe at home, see the following video. Tools and materialsAmong all types of products for storing clothes, the leading place today is occupied by the wardrobe. It is multifunctional, roomy, is available in various shapes and sizes, and also does not require additional space for opening doors. That is why most people when choosing between a wardrobe and a wardrobe prefer the latter option. Assembling a sliding wardrobe with your own hands on the video presented is quite simple - for this it is enough to have the necessary tools in the apartment and be familiar with the design of the product. Often when ordering a cabinet without the services of assemblers, companies send a document in which there is a drawing of the product. It also lists all the component parts that are numbered in order. Looking at the picture and comparing the elements of the cabinet, you can intuitively assemble the product. To work according to the assembly scheme of the sliding wardrobe, the following tools will be required:
Of the additional tools for assembling furniture yourself, a jigsaw, drill and sandpaper can come in handy. It is also necessary to prepare all the details of the cabinet, and this means - check the scheme for matching the number of items. Pay attention to accessories and mechanisms: if there are drawers in the cabinet, ball guides should be included.
Assembly stepsTo know where to start work, it is worth familiarizing yourself with its stages. Most closets are assembled according to the following algorithm:
After the completed steps, the implementation of internal additional elements is carried out. These include pull-out baskets, drawers, rods, hanging hooks and pantographs. Consider installing each cabinet element separately.
CapThe assembly of sliding door wardrobes, the video of which is presented below, starts from the bottom, which accounts for the entire load during operation. We find the part that will perform this function, and put it in front of us. In order for the process to go correctly, we use tools such as screwdrivers or a screwdriver, a hexagon, a pencil and a tape measure for marking. Also check for the presence of self-tapping screws and special camouflage plugs. The action algorithm looks like this:
Some products, such as the Phoenix coupe models, require installation with adjustable legs. It is simple to do: plastic plugs are cut with a knife, and the legs themselves are screwed into the holes 10 mm in diameter prepared at the bottom.
HousingBefore disassembling and assembling sliding wardrobes from scratch, it is important to familiarize yourself with the general structure of the existing product. Carefully study the circuit, because the assembly of the case should ensure the safe operation of the cabinet. From how securely it is installed, the stability of the internal elements will matter. In order for the furniture assembly to be accurate, you should additionally check the floor surface for evenness. Use the construction level: if there are differences on the floor - tighten the adjustable legs. Only then assemble the product box. To qualitatively carry out the installation of the housing, follow these steps:
It’s a little more difficult to assemble a wardrobe of the maestro’s model, which has many functions. Its installation is carried out slowly, preferably by several people.
Rear wall installationTo assemble the compartment yourself, in particular, attach the back wall of the product, you must correctly select the consumables - fasteners. Often, assemblers use improperly selected consumables, which is why over time the panel from the fiberboard departs from the furniture product. In Soviet times, the hardboard on the back wall was collected using nails, which is undesirable today.
When assembling furniture for yourself, it is important to make a high-quality assembly of your wardrobe with your own hands: the video, which is presented below, clearly shows all the complex nuances. Perform the following manipulations:
If the cabinet has several rear walls at once, they must be butt-mounted. Use special tightening fasteners, and then screw the screws on the back of the middle bar.
Mounting shelves and railsSo that you do not have to disassemble the product and redo your work, check the reliability and stability of the frame, and then proceed with filling with internal elements: shelves, rods, drawers and guides. It is possible to engage in self-assembly of a sliding wardrobe according to the video, which is at the bottom of the article. It visually provides information about all the important points of the process. You should pay attention to such nuances:
Before you mount the internal filling yourself, check the availability of all accessories and consumables.
Determine the purpose of the panelsCarefully inspect the panels on both sides to ensure that blind holes and additional markings are not missed. First of all, you need to determine the bottom (bottom) of the wardrobe. There are two types of bottoms: with and without adjustable legs. If you have legs in the kit with the hardware, then the bottom can be identified by special blind or through holes with a diameter of about 10 mm, where they are inserted. Some types of legs are not inserted into the holes, but are fastened with screws, in which case there will be a marking under them on the plane.
The bottom (bottom) of the cabinet without legs has a slightly different design. Its basis is the side panels and special strips (plinths) with a width of 50 to 100 mm, which are located along the perimeter of the bottom and do not allow it to fall through under load. In this case, the bottom will have additional holes for dowels for attaching the base.
Having decided on the bottom, you can immediately postpone the upper panel (roof). In size, it will fit exactly the bottom, but with fewer holes. The sides are easy to take away, as they will be the longest parts, but may differ in the holes for fastening the shelves. Vertical internal jumpers - they are shorter than the sidewalls and have characteristic openings for confirmations or dowels at the ends. Shelves are identified most easily because they have the same (small) dimensions and are glued on only one (front) side. Overhead shelves are very rarely used in sliding wardrobes, so they have at least 2 openings on the ends on both sides. Often in cabinets make 2 extra wide shelves. One stands at the bottom and is used as a stand for shoes, and the second at the top is used as a mezzanine. They also have the same size.
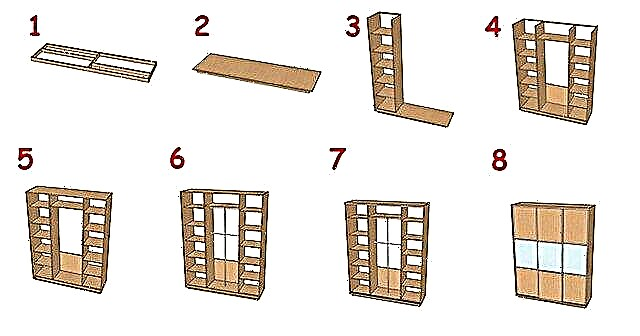
If you have drawers, then the details are easy to identify, since they have the smallest dimensions (width of boards about 120 mm). Rules for installing various hardwareOften they are interested in how to assemble a wardrobe and whether it is necessary to glue wooden dowels? Note that if they are glued, then when moving or repairing, it will not work to disassemble the cabinet without damaging the fasteners. The glue does not add rigidity or structural strength, but is used only in cases where the connection is carried out only using dowels without the use of screws or minifix. How to hammer dowels. They are installed only in the holes on the plane and in no case are clogged in the end of the chipboard, because when connected, the plate can crack. Insert them preferably by hand or with a rubber mallet. You can use a metal hammer, but be extremely careful, since it is easy to pierce the panel through with a dowel. Minifix rods are screwed with a Phillips screwdriver. It is undesirable to tighten them with a screwdriver, since it can easily be turned in the hole and the connection will not be securely fixed. Eccentric discs are inserted after the panels are connected and the rods enter the holes. This will facilitate assembly, since if the disk is not correctly centered in advance, then the minifix rod will not fully enter the hole. A furniture screw (confirm) should be tightened with a little effort, as it can turn in the hole. If this happens, you can use the usual matches (3 pieces) that you need to insert and seal the hole. Assembly procedure for the sliding wardrobeIt is most convenient to assemble a wardrobe by placing it face down on the floor. But immediately you should measure the diagonal of the side panel, not its length, namely the diagonal. It should be 5 cm less than the ceiling height, otherwise the cabinet will not work. In this case, the furniture is assembled standing up and help will be needed to hold the sidewalls.
Do-it-yourself wardrobe assembly begins at the bottom. Install the legs (or socles) on the bottom panel and insert all the fixed hardware into the holes: dowels and minifix rods. Then insert all the hardware into one of the side panels and connect it to the bottom. If you have a wide cabinet, and there are vertical jumpers, install the closest panel to the sidewall already standing. After that, you can take turns installing shelves between them from the bottom up. Thus, the next jumper is installed and fixed by shelves. Having reached the last side panel, you should pay attention to how the roof dresses. If on top, then the last panel is installed, and then the roof is put on the cabinet. If the roof is between the side panels, then the roof is installed first, and then the last side panel. Nail the back wallAfter assembling the frame, you can nail the fiberboard from the back. The manufacturer mainly makes the back wall of several parts, so first try on them so as not to be mistaken. During long-term storage, chipboard can be slightly deformed, especially for long parts (sidewalls). Therefore, there is an arc (stomach) which can be removed by correctly nailing the fiberboard. To do this, attach it to the cabinet, find the flat side and nail it first. After aligning the curvature, nail the other side.Fiberboard is cut on sawing machines and has an almost perfect rectangular shape. Thanks to this method, you will perfectly align the cabinet by removing the diagonal curvature. To check, take a tape measure and check the diagonals of the cabinet, the permissible deviation is 5 mm per 1 m.
Often wardrobes are equipped with radius additions on the sides of the wardrobe. They have a simple design and sometimes are independent elements that are separately assembled and attached to the cabinet. This also applies to the decorative figured roof (visor), in which the backlight is mounted. Often, the structure is fastened with furniture ties. Installation of additional elementsThese include box blocks, a pipe for trempels, hooks, a pantograph, a backlight. Such elements are standard purchased products, which have their own individual installation instructions indicating all mounting sizes. An exception is only a pipe for hangers. In width, it is attached exactly in the middle of the cabinet, but the height can be chosen arbitrary. Usually retreat from the top shelf down to 50 - 100 mm. Door system installationOnce the assembly of the sliding door wardrobe is done, and all the elements are installed, you can proceed with the installation of the doors. Consider the most common system, it costs less than all the others, therefore it is most popular. There are 2 guides in the kit, one of which is high - mounted on the top and low with slots under the wheels - mounted on the bottom. For fastening, furniture screws 12-16 mm long with countersunk or flat head are used.
Rail InstallationThe upper bar is installed flush with the end of the roof. First attach one side, align the bar to the end, and then screw the second. After that, install the remaining intermediate screws. This sequence will completely eliminate the skew of the bar.
Door adjustmentNow you need to correctly adjust them, for which there are holes and adjusting screws for the hexagon by 5 at the bottom of the doors on both sides.
Use the L-shaped key to turn the bolt clockwise or counterclockwise. Watch how the fit of the door to the sidewall changes, and make it with a minimum clearance.
When the doors are adjusted, the stoppers must be adjusted correctly. They are needed so that the doors stand motionless in the closed position. Set them in such a way that the wheel exactly hits the stopper, and the end of the door does not reach the wall about a millimeter. If there are more than one door, the extreme latches are adjusted first, and the rest are already centered on them. When the adjustment is completed, a buffer fleece tape is glued to the side ends of the doors (on both sides). It is needed so that the doors do not hit the walls (or each other) and do not damage the chipboard. Please note that after loading the cabinet with things, it may deform a little and you will need to re-adjust the doors. → The catalog with furniture prices Borovichi will tell you how to choose a wardrobe and other furniture, be sure to look! Leave your tips and comments below. Subscribe to the newsletter. Good luck to you, and good to your family! Watch the video: How To Assemble A Wardrobe Insert Unit - DIY At Bunnings (January 2025). |