The main element, gypsum decorative stone, you already have. It remains to stock up with the rest of the materials and tools that will be required for work. Here is an arsenal of what you need:
- gypsum or other adhesive for this purpose,
- deep penetration primer
- ordinary spatula and serrated
- miter box, to give the stone the desired shape in the corners,
- tape measure, level, plumb line,
- pencil,
- mounting gun
- hacksaw for metal,
- acrylic lacquer,
- roller with a bath,
- sponge to remove excess glue.
When you have everything you need, you can get to work. The process itself is simple, you just need to follow the instructions. To begin with, it is important to prepare the work surface. Ideally, if it is plastered. Then a primer is applied to the surface. The best way to apply is to use a roller and a bath.
Now you can do the preparation of the adhesive. Many people prefer to use glue for ceramic tiles. Only now it can be improved a little by adding a little PVA glue to the composition. The ratio is from 6 to 9% of the total. Thanks to this, he will receive water-repellent properties. Everything is thoroughly mixed with a mixer to get a homogeneous mass.
Everything is ready for installation. The first row of decorative gypsum plays an important role. The further laying depends on it. Therefore, it is important to make it perfectly smooth. To do this, markings are made on the wall using a level, a plumb line, a tape measure and a pencil. The marking should be perfectly even. After that, the laying process begins. The adhesive is applied to the surface of the wall or to a gypsum decorative stone. For reliable fixation, the mixture can be applied to both surfaces. Furrows are made using a notched trowel. It remains only to attach the first stone in its place according to the marking and press it to the surface. After that, you have from 6 to 12 seconds to adjust the location of the decorative element of gypsum. Watch for roughness and bonding quality. Other gypsum parts are glued in the same way.
Advice! Use a straight spatula and a sponge to remove excess glue. Otherwise, it will dry and petrify, adhering to the surface.
A hacksaw is used to fit the elements. It happens that the decor is made curly, processed arch, column or corner of the wall. In this case, use the miter box, cutting the product at an angle. To give the product a neat appearance, it is sanded with sandpaper. After the laying of the gypsum decorative stone is completed, the mounting grooves between the plates are filled with the aid of a mounting gun. A soft sponge is needed in order to remove excess. But, many lay a stone close to each other, without creating seams.
The final step is to process the varnish to protect it from moisture. This is done at will. And in the case when the gypsum stone has no color, before varnishing the surface is painted in the desired color.
Advice! Remember, you need to work with gypsum decorative tiles under the stone carefully so as not to damage it.
That's all the work. As you can see, this is not difficult, especially if in addition there is a wonderful videorow. This video has another interesting way of laying decorative gypsum, which is slightly different from the one described above. You can use it as a basis.
Laying decorative plaster brick. Advantages and disadvantages of gypsum brick tiles for interior decoration
The use of gypsum tiles under a brick as a finishing material has a lot of positive properties, each of which is worthy of attention:
- light weight material. Due to the fact that gypsum tile is many times lighter than many other materials, the installation procedure is facilitated and there is no need to strengthen the base, which is a mandatory procedure in many other cases. It can also be noted that the load exerted on the structure as a whole is reduced,
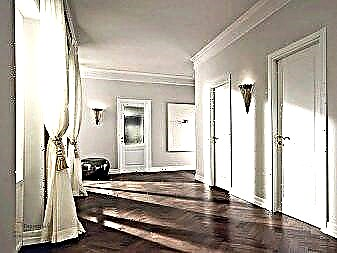
Interior decoration with decorative tiles will allow you to stylishly and practically decorate the interior
- to independently carry out installation is not difficult even for a beginner. There is also no need to purchase any special tool. Moreover, after reading the recommendations on how to make a decorative stone with your own hands, it is quite possible to refuse to purchase finished material in favor of home-made,
- environmental friendliness. Considering that all components and materials of which the tile consists are natural, this material does not pose a threat to human health,
- a wide range with a choice of a variety of colors, textures and imitations of other materials,
Due to these positive aspects, many homeowners and the designer believe that buying brick tiles for interior decoration is the best solution of all that is offered on the modern market. Thus, you can diversify the interior, while not spending too much money and effort on remodeling.
The walls of the living room are tiled with gypsum.
Although it is worth paying attention to some of the shortcomings, which, although not significant, should still be considered in advance:
- the material is not resistant to moisture, actively absorbing it upon contact. As a result, products are highly susceptible to deformation. To avoid this, if used in rooms with high humidity, a layer of a special protective composition is applied to the surface,
- gypsum tile is a brittle material that is unstable to mechanical stress and requires careful handling,
- Caring for such a tile can be difficult, especially if its surface is embossed and capable of accumulating dust.
In order to minimize such negative phenomena that may be characteristic directly for this material, it is important to follow all recommendations during the installation process. And also do not use this material for facing surfaces that are highly susceptible to contamination.
How to glue a decorative stone at the corners. Laying decorative stone
So, this process is divided into four consecutive steps, the observance of which will lead to a positive result.
At this stage, it is important to carry out the correct kneading of the adhesive composition. It should be sufficiently elastic and thick, but in no case friable. When gluing an artificial stone, it should be well pressed. This is especially important when the stone is placed on a cement mortar. Squeeze should be in moderation, so that the remnants of glue come out around the perimeter of the tile. This will avoid voids and also provide excellent sealing. In the next step, all joints and joints will be decoupled.
If the stone should be cut, then you can use a hacksaw or grinder. If the stone is on a gypsum basis, then it is better not to use a grinder, since there is a risk of cracking the stone. At the same time, try to place the trimmed edge in places that do not catch the eye. In this case, the appearance of the finished wall will be more aesthetic.
If the stone you bought should have seams, then strive to ensure that they are even. Watch the width and parallelism of the rows. However, one should not achieve such accuracy as when laying tile, where every millimeter is taken into account. Some negligence can only benefit.
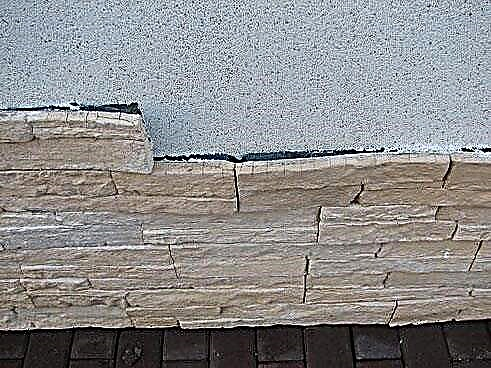
Installation of decorative stone is best started from the corner. This is due to the fact that this technology does not provide for corner elements. Stone laying should be carried out sequentially, row by row. At the same time, head upwards. If you want to start laying from the middle of the wall, you can fill the guide rail. It can be an aluminum profile. This process will avoid getting glue on the tile, since each row will abut against each other.
In most cases, a decorative stone is placed under the joint. This implies a certain removal of the tile from each other. These seams, in the process of crushing the stone can be filled with glue. Therefore, it should be carefully removed. After these seams are filled with a special stitching. If the jointing mixture consists of the same adhesive composition, then removing the glue residue from the joints does not make sense. When the mastic completely hardens, it can be tinted in a different color, which will enhance the expressiveness of the decorative stone. As for the width of the seam, here everything will depend on the tile you choose. The seam can be millimeter or have a width of several centimeters. For example, when a brick is laid under the jointing, the standard seam width is 1.2 cm. In the case when there should be no seams between the stones in the masonry, it should be laid as tightly as possible to each other. If the process of gluing the tiles went right, then for the formation of the seam may be enough glue that went into the seams. To make it out, wait a little, so that the mixture hardens slightly. Formation can be performed using a special wooden spatula, which should have a certain shape and an appropriate thickness for the seam.
Laying decorative stone corners. How to glue
First of all, a prepared and even surface is covered with a thin layer of primer. While it dries, they are engaged in the preparation of glue. Before you start laying the stone, you should draw an even horizontal line, using the level for this, as well as an even rail.
The laying of decorative stone begins from the corner of the hallway. As a rule, some manufacturers make special corner tiles, but there are times when they are not. In such cases, the corners are laid out by “terminal” fragments. Such tiles are available in almost all collections. They can be identified by the painted edges. If necessary, then they are used last in a row. In this case, all ends will have a decorative look.
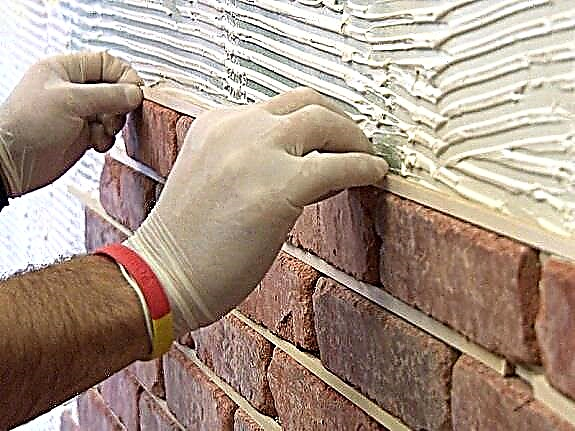
In any case, the back side of the tile will have to be carefully examined, because in these places there remains baked cement milk. It can be determined by the thin foamy coating of a light shade. This coating must be removed using a hard, possibly metal brush.
In conditions when the ambient temperature is too high and there is a lack of humidity, the reverse part of the stone is wetted with water. After that, a layer of glue is applied to the stone surface with an ordinary spatula. The adhesive layer is leveled, and its remnants are removed with a notched trowel, with tooth sizes up to 5 mm.
Glue on the stone
Removal of excess solution
After that, a fragment of the finishing material is pressed to the surface. In this case, the stone moves from side to side to get reliable contact with the surface. After that, the tile is fixed in the desired position. For reliability, you can take a rubber mallet and lightly tap it on the surface of an artificial stone.
What to glue and how to lay gypsum tiles under a brick or stone: wall decoration and installation options with wallpaper
The use of gypsum tiles in the interior of the room is a universal decorative solution with which you can show and realize design imagination. This material is easily mounted on walls, corners and ceiling zones, simulating natural stone or brick. About what are the advantages and disadvantages of the material, as well as how to fix it correctly, later in the article.
Plaster tile for interior decoration under a brick: advantages and disadvantages
Gypsum is a lightweight material that, if necessary, takes the necessary shape, structure, relief. The use of this material in the decoration of the interior space of a room is a simple, material feasible and physically feasible task.
Advantages of the gypsum stone finish inside the building:
- A wide range of products that differ in texture, price, size and appearance.
- Relatively low pricing policy.
- Natural compounds.
- The ability to customize finished tiles to suit the surface.
- Simple design, installation to the wall.
- Light weight of finished products, which allows you to use on any surface without the risk of wall deformation.
Among the disadvantages there are such features as moisture absorption, lack of resistance to mechanical damage and crumbling. However, such disadvantages are insignificant, and during operation the material will not require laborious care. If necessary, you can replace damaged cracked tiles with new ones without violating the integrity of the wall.
Positive points of the tile
This material is environmentally friendly and does not harm humans, respectively, tiles can be used with full confidence in order to decorate the interior of the premises.
By clicking on the link http://vse-postroim-sami.ru/materials/flooring-tile/5122_zhidkaya-plitka-dlya-pola-ustrojstvo-i-osobennosti-ispolzovaniya/, you will learn more about liquid tiles. This article addresses the issue of what is best to put on the floor in the kitchen, linoleum or tile. You might also be interested in the article on updating tile seams.
An absolute plus is the low weight of the material. In small apartments with thin walls, such a cladding would be ideal. The walls do not need to be further strengthened, the tile can be safely glued to drywall, which is primed. The material is very light, so mounting it is also quite simple.
The thickness of the tiles is the same. When you make a surface that mimics natural stone, you will not need to adjust certain elements to the required thickness than when working with natural material.

Plasterboard installation on drywall
The walls on which gypsum is applied breathe very well, because the material has excellent vapor permeability. Thanks to this characteristic, a room that is decorated with gypsum tiles will always have the necessary humidity. Material absorbs unnecessary moisture in itself, and vice versa, it gives off moisture in dry air.
The material is not very expensive; people who have average wealth can afford it. At the same time, the tile is strong and durable. After laying it, you can not make repairs for at least ten years.
The color remains the same for many years, and it will look the same decorative. There are a lot of tile options, so it can be used in a wide variety of styles and designs. Gypsum is harmless during fires.
Negative points
The material is not very resistant to humidity, that is, it is not necessary to work in rooms that have very high humidity, since gypsum quickly becomes unusable.

Gypsum is used only in rooms with low humidity.
At high temperatures, gypsum is quickly destroyed. Surfaces located near heating pipes should not be decorated with tiles. It is better not to decorate fireplaces with this material in such situations when they do not have an additional layer of protection. It is better to veneer the interior, facades should not be clad with gypsum.
Installation of tiles on various substrates
The wall on which the installation will be carried out must have the following characteristics:
- hardness and surface strength,
- lack of uneven sections and sharp drops,
- lack of deformations.
Walls are created from a variety of materials, we will analyze individual installation rules.
When working with concrete, there will be no big problems. It is only necessary to take into account the porosity of this material.Concrete, which has practically no distinct pores, must be treated with a good primer.
Installation of gypsum tiles on concrete
Before starting work on laying gypsum tiles on the walls, it is worthwhile to check the strength of the surface. When the plaster does not fall off the wall and holds well, you can simply paint it with a primer.
Do not mount the tile on painted concrete. The surface must be scratched, making the mandatory misfires, then it should be wiped and covered with a layer of plaster.
If you want, then you can put the tile on the wall of brick, if it is laid neatly, the seams are made without voids. In this case, you can apply glue specifically designed for tile. Initially, you can make notches on the wall, and after that cover the wall with a composition of soil. If the masonry is old enough, it is better to coat the walls with a primer or plaster.
Installation can be done on the wall from plywood or drywall. The requirements in this case are similar, the wall should not be wet and subject to deformation, it must be firmly fixed. On sheets of plywood or drywall, it is necessary to apply a layer of primer, after it dries, glue the tile.

Installation of gypsum tiles on a drywall base
Tile glue is currently a lot, because the material has excellent adhesion. When working, you can use simple PVA, cement mixtures are also suitable, or you can use mastics that can level the base when conducting work. When fastening tiles, silicone sealants or adhesive compounds intended for tiles are often used. We will analyze the technology of laying gypsum tiles.
Installation work
It is advisable to divide the entire installation into sequentially performed actions.
Initially, it is worth preparing a wall where further work will be carried out. The following requirements are imposed on the wall: surface dryness, evenness, purity from any kind of small fragments of the previous coating, dust and other debris. If there are protrusions or irregularities, cracks or indentations, the surface should be leveled with putty.
Ready to work surface should be covered with a layer of the composition of the soil in order to further keep the tile on it stronger and more reliable.

After completing the previous step, you should proceed with the markup. To do this, you need to take a pencil with a linear one, and also do not forget about the construction level, through these objects you need to draw horizontal lines on the surface, which will subsequently be a guide when installing gypsum boards.
Now you can start laying the tiles on the marked surface. Glue should be applied to the back of gypsum elements according to the instructions indicated in the instructions for use. In work, use a spatula, the thickness of the glue should be approximately 5 mm. Installation is best done in the summer, because the humidity is not very high, and the air temperature should not be lower than 10 degrees with a plus sign. The tile sticks quite quickly, after applying the solution it needs to be pressed to the surface, hold for some time and continue facing with the next tile.
It is best to start work from the corner of the room, while gradually moving to its central part. You need to start laying from top to bottom, while it is worth calculating the number of rows initially. When the necessary element cannot be completely placed, the necessary part should be cut off with a metal saw. After the wall is finally pasted over, the surface should be given an aesthetic appearance through seams.
Laying gypsum tiles without seams is somewhat easier, but in the end it does not look as beautiful as if they were available. It makes sense to fill the seams with gypsum glue. Within 20 minutes after the seams are made, it is necessary to iron them with a special spatula made of wood. After the solution dries, the remaining excess is removed with a wet cloth.

We fill the joints between the tiles
When working on a cement mortar, in order for the adhesion to be more durable, it makes sense to slightly wet the tile itself, as well as the surface on which it is applied. Next, consider two methods for laying gypsum tiles.
Dry tile laying
Let us outline some features of the laying of the dry method. Tiles should be laid in vertical rows. Tiles are used that have protrusions on opposite sides. Begin laying from the corner of the room. Initially, in the corner of the room, a mounting rail is attached. It should be mounted vertically. Next, measure the width of the tile and attach the next rail. After that, it is already possible to lay the tiles themselves, you need to move from the ceiling in the downward direction.

Gypsum tile stitching
Wet Tile Laying
Now we indicate the characteristic features of this method of laying tiles. The main distinguishing feature is that with this method, the movement occurs from floor to ceiling horizontally, that is, we can say in the opposite direction. The tile should be covered with mastic on the reverse side, in addition, also on the base side.
After a while, the mastic sets, the tile should be applied to the prepared surface. When finishing laying the entire tile, you can begin to work with the seams. In this case, a grout is best suited, in which a mastic made of polymer cement or a mixture of cement and sand is used. The joints and seams that formed between the tiles should be filled with this solution only half.
Before starting work, it makes sense to watch a video to avoid numerous errors.
Base leveling
The first thing you should pay attention to before laying a gypsum wall is the evenness of the surface. Of course, you can also put it on uneven walls, filling the pits with glue mixture, but in this case, the consumption of expensive glue increases, and it is also possible to crumble the tile itself, which bursts when pressed.
Therefore, before laying a brick of gypsum, it is worth leveling the wall with putty. After applying the putty and its drying, it is worth sanding the surface, applying a primer for better adhesion. After all the work, you can start gluing gypsum tiles.
What to glue: the choice of glue mixture than to stick
Depending on the area being processed, the size and color of the gypsum tile, it is worth choosing a separate version of the adhesive mixture on which the tile is laid to the base. Today there are several options for fixing plaster on the walls:
- Dry seven based on gypsum and cement. If you choose dry mixes for self-preparation of a solution for gluing, you should pay attention to the composition of the material: cement is not recommended for use on light tiles without varnish for the reason that it will absorb moisture, dry longer, and may be deformed during work . The gypsum base is safer to use, but will require certain skills on the part of the worker. If the technology is not followed, the tile will absorb water, soaking over time. Popular manufacturers of dry mixes for gypsum tiles are Perlfix, Litokol K, Satyn PKG-28.
- Liquid nails or sealant. It is possible to stick gypsum tiles to sealant or universal adhesive like "Dragon", but the process is unreasonably time-consuming. In addition to the fact that each tile needs to be sanded to form bumps for better adhesion to the wall, it also needs to be kept for at least 2-3 minutes, which unreasonably increases the duration of the installation of the entire wall.
Directions for use
Before laying gypsum, you need to familiarize yourself with a number of important material features.
It is good in that it is applicable to almost any surface. You can glue it on any surface that is not amenable to deformation under the influence of external temperatures and humidity levels: tiles, concrete and others.
- The material is not suitable for installation on materials that are deformed under the influence of the external environment: wood, chipboard, plywood, fiberboard and so on,
- The gypsum-based tile is not moisture resistant, and therefore its use is not permissible in rooms with a high level of humidity (above 75%),
- Do not allow glue to get on the front side. Moreover, it should not be allowed to dry, because it will harm the look
- Separate attention requires joint seam. The solution should not get on the front side,
- It is necessary to observe the temperature regime during installation. The air of the room and the base for installation should have a temperature in the range from 10 to 40 degrees,
- Seam expansion cannot be carried out earlier than a day after laying.
For the installation of gypsum tiles, you can use:
- silicone based sealant
- cement adhesive for tiles,
- laying of tiles on gypsum plaster is also possible.
Preparation of materials
Installation of gypsum tiles does not require special preparation of the base. It is enough to observe the basic principles:
- the surface should be smooth, without bumps and undulating bends,
- the base for the tile must be cleaned and degreased,
- if the surface has pronounced absorbent properties or is porous, it must first be primed.

Glue for laying must be prepared according to the instructions for use indicated on its packaging by the manufacturer. It is important that the adhesive solution, when applied to a wall or other surface of the adhesive solution, must be monitored so that it fills all microcracks. However, a large amount of adhesive can create a “cement joint”. It is best to use a notched trowel for applying the solution.
Pay attention to the amount of glue prepared. Do not knead it too much, as you may not have time to spend it before the end of its suitability. It is worth considering that facing corners takes a little longer than when working on the wall.
Installation of gypsum tile
Before proceeding with the installation, it is necessary to remove the tiles from the packaging and lay them on the floor in order to choose the elements that are suitable in color and size. It is also advisable to pre-mark the surface for laying. For convenience, it is worth dividing the wall into work areas with an area of five rows of tiles each. For the best result, it is not out of place to use the level during the installation process.

Gypsum tile is an easy-to-apply material for mechanical impact. If necessary, the elements can be given the desired shape and size. You can cope with this using an ordinary drill or hacksaw for metal. If you pay due attention to how the stacked row will be located on the wall, you can avoid a large number of cuts.

You can lay gypsum tiles with or without seams. If the seams are supposed, then it is first necessary to calculate the distance under them. At the same time, if laying implies the presence of seams, then it is worth starting it from the top edge of the wall. If not, on the contrary - from the bottom. If the tile seam is not supposed, then it is not necessary to place vertical joints between the elements on top of each other. This will violate the decorative task of imitating natural stone. It will be optimal to observe a displacement of the seams by 5 cm from each other. How to glue gypsum tiles - with or without seams, depends on the general appearance of the interior and the general decoration decisions.
Laying decorative gypsum tiles is a creative process. Reminds a process of facing with a stone. General view should be harmonious and aesthetic. Avoid a large concentration of identical patches in the same zone.
Stitching
The presence of seams helps to avoid the ingress of dust and dirt into the gaps between the elements, to ensure sealing. The expansion is carried out using a special bag or a syringe gun. A special cement-based mortar is used as a grouting material. This allows you to simulate the laying of natural stone.

When stitching, it is necessary to fill the syringe with a solution and slowly squeeze it in the direction of the seam. After the solution has set a little, press it with a spatula.
It is recommended to fill the seams completely 5 mm from the back of the tile.
You can remove excess solution after 40–45 minutes, when the grout is slightly hardened. You can use a wooden or special metal trowel for this.
Advantages of gypsum tile
- Easy installation - no special skills required.
- Decorative features. A beautiful imitation of natural stone or brick.
- Low cost, from 450 r / m².
- Light weight. You can even lay it on drywall walls. Lighter than cement decorative tiles.
- Environmental friendliness. Gypsum is a natural material.
- The "warmth" of the material.
- The possibility of self-manufacturing.
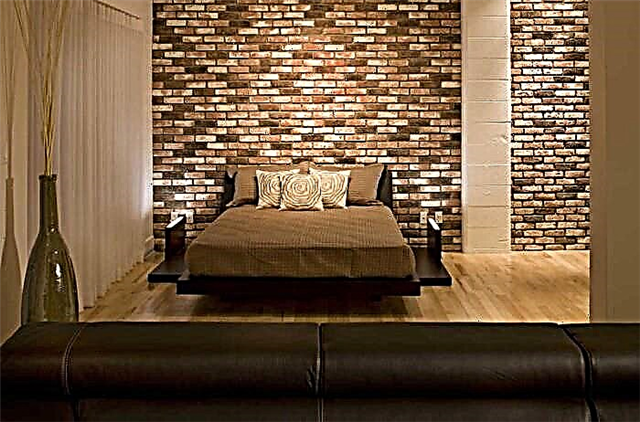
Wall decoration in the bedroom.
Disadvantages of decorative tiles
- High water absorption and low frost resistance. Gypsum tile strongly absorbs water, this forces it to be used only for interior decoration in dry rooms.
- The difficulty of cleaning. Over time, dust accumulates on the embossed surface, which is difficult to remove. To protect against dirt, the tile is coated with a protective varnish.
- The risk of buying low-quality products. The quality of gypsum tiles largely depends on the brand of raw materials. Unscrupulous manufacturers often save on the source material, which leads to the rapid destruction of the plates.
Gypsum tile on the facade will collapse in 1 year.
Cheap gypsum "Kasavaga" on the street will not stand even 1 season. Scope and decoration optionsThe most common texture of gypsum tiles is brick and stone. In addition to apartments and country houses, decorative tiles can be found in restaurants, hotels, exhibition halls, offices.
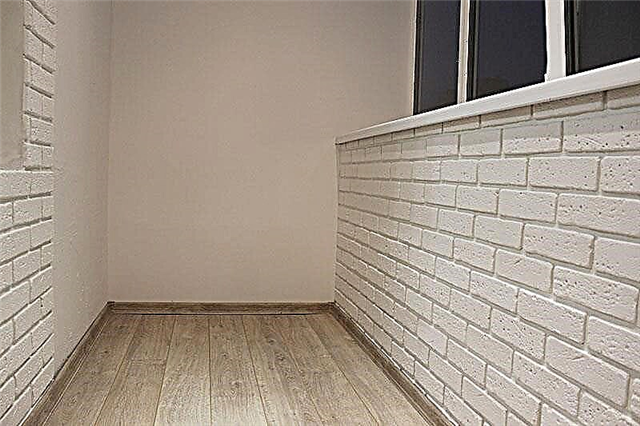
The walls on the balcony are decorated with white plaster tiles under a brick.
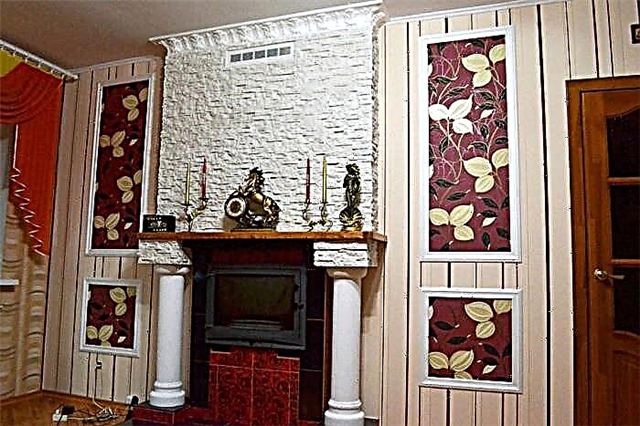
Facing around the fireplace.
Brick wall decoration with plaster tiles. Speaking about the texture “under the stone”, it is very important to note the value of the angle under which the light will fall on the tile. When laying with a brick option, it is also reasonable to pay attention to this, but an uneven stone surface requires accuracy. Before facing, we recommend testing for dry finishing material so that you do not subsequently reproach yourself for thoughtless design.
Wall decoration around the fireplace without lighting.
With the backlight on. For laying decorative tiles, concrete, brick, gypsum, plasterboard and plaster base are suitable. Facing on a non-standard foundation requires a non-standard and approach to preparation. In such situations, a layer is created that is in good contact with both types of surfaces. For example, laying tiles on tiles is possible provided that a layer of strong glue is applied to the old tile, which does not peel off. The adhesive, in turn, is a good base for gypsum plastering.
Tool
Materials
Plaster casting.
Step 1: MarkupThe technology of gypsum lining, including marking, is similar to the technology of laying ceramic tiles.It is important to find the starting points, horizontal and vertical, on the basis of considerations of smooth, precise cladding and geometric aesthetics. Typically, decorative tiles begin to be laid from the corners, so the markings are tied to them. Decorative stone tiles are often of different sizes, so keep this in mind so that there are no takes going one after another. Gypsum tiles under a brick in this regard are simpler, if necessary, you can immediately mark the location of any element.
Layout of each row to avoid trimming top and bottom. At the bottom of the wall a stucco was made in stucco so that the laminate would leave for a beautiful adjunction. Step 2: LayingTo mix glue use a drill with a mixer nozzle. The consistency of the composition should resemble thick sour cream. Apply the mixture with a spatula to the base, previously primed to strengthen the surface and adhesion. To level the glue layer, the residues are removed with a notched trowel - a comb. Next, lay the tile, firmly pressing it to the base.
Glue application with a spatula-comb. Step 3: TrimmingSince gypsum is a soft material, it can be cut with a hacksaw. For convenience, a grinder is used, but there is too much noise and dust from it. It is important to properly align the outer corners. To make them look beautiful, they cut the tile at an angle of 45 degrees. This is where the miter box comes in handy. Some locations may require additional processing. In this case, the tile is sanded with a block and brought to the standard with sandpaper. Arches and similar places force to perform curly cutting. In the case of tiles with torn edges, it is easiest to cut along the invoice line. If you use a grinder, you can not pay attention to this.
Step 4: GroutingAs a putty for joints, either a special grout mixture, which is used in a dry form, or gypsum glue, is used. Apply it in the gaps between the plates using a special narrow spatula. And with it, the puffer is leveled. An alternative is a gun or a milk bag. One side is cut in width, on the other a hole of 4-5 mm is made. Fill the bag with a mixture of “sour cream” type and squeeze it through the hole into the seams.
First, the mixture is applied from a gun or bag with a cropped angle. When it becomes elastic, it needs to be smoothed out with a joint. If the color of the tile differs from the tone of the putty, and this is not included in the design plan, after grouting, waiting for the setting, you need to color the intergrated spaces with dyes. At a good manufacturer of plates, they come complete with facing material. Staining is performed using a narrow brush. They paint not only seams, but also possible chips that could form during the laying process or during production. After finishing work, it is recommended that the tile be varnished with water-based varnish to protect it from moisture, which can get accidentally or during wet cleaning. Since gypsum tiles are used for interior decoration, such processing completely solves the “water-repellent” problem. Do it yourselfIf the volume of the cladding is large, then it makes sense to acquire shapes (or make it yourself) and make tiles at home. Home Making Video: Decorative gypsum tiles have a wide range of applications. But do not forget about the cons when you choose the facing material. Consider not only the relevance of gypsum in the context of an interior idea, but also the quality of the material. When planning a facing of a working fireplace, do not skimp on the time necessary to find a good manufacturer. Low-quality tiles at high temperatures simply can not withstand heating and exfoliate, or even crack. Sometimes it is useful to double apply glue, including on the stove. This will increase adhesion and, subject to other requirements, guarantee the durability of the lining.
|